
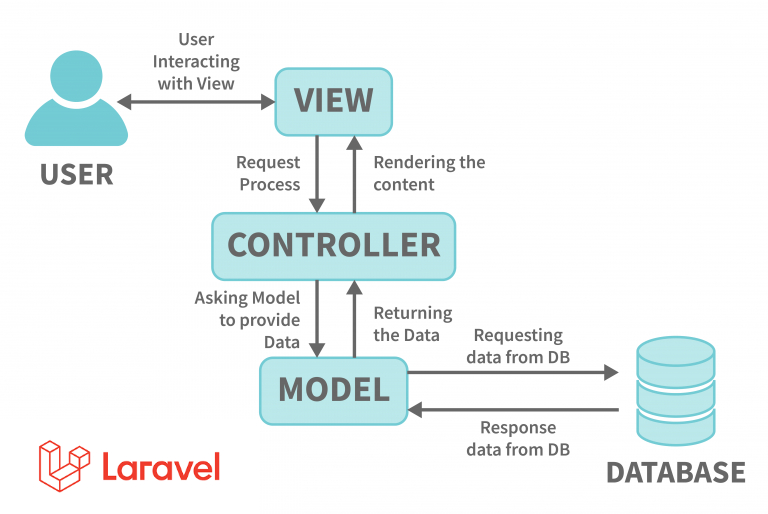
Building a blog is one of the best ways to understand the full life cycle of a Laravel application. You work with routing, controllers, views, models, migrations, relationships, validation, middleware, file uploads, and security. In this article, I walk you through all of these parts in a structured way. It is written to help young and new developers build a practical blog that supports creating, reading, updating, and deleting posts while also handling images, generating slugs, and securing admin actions through authentication.
Before going into every step, keep in mind a common mistake. Many tutorials jump into writing controllers before setting the environment correctly. That causes version mismatches, Tailwind not compiling, or unexpected PHP errors later. So the first section focuses on laying the groundwork in a predictable and reproducible way.
1. Environment Setup
1.1 Check PHP and Composer Versions
Laravel 12 expects modern PHP. Running outdated versions produces subtle errors that waste hours later.
Run these commands:
php -v
composer -v
Make sure PHP is at least 8.2 and Composer is up to date.
1.2 Create the Laravel Project
composer create-project laravel/laravel blog-laravel
cd blog-laravel
Once done, launch your server:
php artisan serve
You should see the default Laravel welcome page.
1.3 Install and Configure Tailwind CSS
Many skip this and end up styling with inline CSS. Tailwind gives the flexibility of utility classes, which is cleaner for component based Laravel Blade.
npm install
npm install -D tailwindcss postcss autoprefixer
npx tailwindcss init -p
Update tailwind.config.js:
content: [
    "./resources/**/*.blade.php",
    "./resources/**/*.js",
]
Start the build watcher:
npm run dev
Your Laravel app now supports Tailwind.
2. Planning the Database Schema
A blog normally has these fields for posts:
- id
- title
- slug
- body
- image
- user_id
- created_at and updated_at
Slug generation is often ignored until URLs break. Plan for it now because it affects routing.
2.1 Create the Migration
php artisan make:migration create_posts_table
Inside the migration:
Schema::create('posts', function (Blueprint $table) {
    $table->id();
    $table->string('title');
    $table->string('slug')->unique();
    $table->text('body');
    $table->string('image')->nullable();
    $table->foreignId('user_id')->constrained()->onDelete('cascade');
    $table->timestamps();
});
This foreign key forces every post to belong to a valid user.
Run the migration:
php artisan migrate
3. Creating the Post Model and Relationship
php artisan make:model Post
Inside Post.php:
public function author() {
    return $this->belongsTo(User::class, 'user_id');
}
This relationship powers author names in the frontend without needing extra queries.
4. Building the Resource Controller
Laravel resource controllers reduce repetitive code. They also map cleanly to CRUD.
php artisan make:controller PostController --resource
This generates methods for index, create, store, show, edit, update, and destroy.
4.1 Add Resource Routes
In routes/web.php:
Route::resource('posts', PostController::class)->middleware('auth');
Now only logged in users can manage posts. Readers can still view public blog pages, which you will handle later with public routes.
5. Working With Blade Templates
Many new developers cram all HTML into one file. A better approach is to structure templates with layouts and components.
5.1 Create a Layout
resources/views/layouts/app.blade.php:
<html>
<head>
    <title>{{ $title ?? 'My Blog' }}</title>
    @vite('resources/css/app.css')
</head>
<body class="bg-gray-100 text-slate-800">

<nav class="bg-white shadow p-4 flex justify-between">
    <a href="/" class="font-bold">My Blog</a>
    @auth
        <a href="/posts/create">New Post</a>
    @endauth
</nav>

<div class="max-w-4xl mx-auto mt-10">
    {{ $slot }}
</div>

</body>
</html>
Now you can wrap any page inside this layout:
<x-layouts.app title="Create Post">
   // content here
</x-layouts.app>
6. Implementing the Post Creation Form
6.1 Create Blade File
resources/views/posts/create.blade.php:
<form action="{{ route('posts.store') }}" method="POST" enctype="multipart/form-data">
    @csrf

    <input type="text" name="title" class="border p-2 w-full" placeholder="Title">
    <textarea name="body" class="border p-2 w-full mt-4" placeholder="Body"></textarea>

    <input type="file" name="image" class="mt-4">

    <button class="bg-blue-600 text-white px-4 py-2 mt-4">Publish</button>
</form>
7. Handling Validation, Slugs, and Image Uploads
Inside PostController@store:
$data = request()->validate([
    'title' => 'required|min:3',
    'body' => 'required|min:10',
    'image' => 'nullable|image|max:2048'
]);

if (request()->hasFile('image')) {
    $data['image'] = request()->file('image')->store('images', 'public');
}

$data['slug'] = Str::slug($data['title']) . '-' . uniqid();
$data['user_id'] = auth()->id();

Post::create($data);
Key notes that developers often ignore:
- Slugs must be unique or you break routing
- Store images in storage/public for easy CDN use later
- Avoid trusting user input for author id
8. Displaying Posts on the Frontend
PostController@index:
$posts = Post::with('author')->latest()->paginate(10);
return view('posts.index', compact('posts'));
Blade file:
@foreach ($posts as $post)
    <a href="{{ route('posts.show', $post->slug) }}">
        <h2 class="text-xl font-semibold">{{ $post->title }}</h2>
        <p class="text-gray-500 text-sm">By {{ $post->author->name }}</p>
    </a>
@endforeach
This uses eager loading to avoid N+1 query problems. A surprising number of devs miss this until the site slows down.
9. Creating the Show Page
public function show(Post $post) {
    return view('posts.show', compact('post'));
}
Blade file:
@if ($post->image)
    <img src="{{ asset('storage/' . $post->image) }}" class="w-full mb-4">
@endif

<h1 class="text-3xl font-bold">{{ $post->title }}</h1>
<p class="mt-2">{{ $post->body }}</p>
10. Editing and Updating Posts
Update form pre fills values:
<input type="text" name="title" value="{{ $post->title }}">
<textarea name="body">{{ $post->body }}</textarea>
Update logic:
$data = request()->validate([
    'title' => 'required',
    'body' => 'required',
    'image' => 'nullable|image'
]);

if (request()->hasFile('image')) {
    Storage::disk('public')->delete($post->image);
    $data['image'] = request()->file('image')->store('images', 'public');
}

$post->update($data);
Note the delete step. Leaving old images behind bloats disk usage quickly.
11. Deleting Posts Safely
public function destroy(Post $post) {
    Storage::disk('public')->delete($post->image);
    $post->delete();

    return redirect()->route('posts.index');
}
Soft deletes are optional but useful for recovering lost content.
12. Securing Actions With Authentication
All admin actions are already behind middleware due to resource route protection:
Route::resource('posts', PostController::class)->middleware('auth');
If you want extra rules like authors only editing their posts, add this in update and destroy:
if ($post->user_id !== auth()->id()) {
    abort(403);
}
13. Testing the CRUD Flow
Check each part:
- Create post
- Slug generated correctly
- Image uploads work
- Author name displays
- Edit preserves slug or regenerates it depending on your logic
- Delete removes file from storage
- Authentication blocks anonymous users
Testing this cycle is the best way to catch indexing or routing mistakes.
Closing Thoughts
This project covers the full spectrum of Laravel skills. If you build it cleanly, you understand routing, Blade, Tailwind, migrations, relationships, middleware, validation, and file handling. Most real world projects follow similar patterns, just with more models and relationships. The key is not writing code fast, but structuring it so it is readable and predictable.


